Quick Answer
Exterior paint fails in Jacksonville for eight primary reasons: moisture trapped under the paint film, inadequate surface preparation, painting in high humidity or extreme heat, using the wrong type of paint for the surface, applying paint over a dirty or chalky surface, skipping primer on bare or porous surfaces, caulk failure at joints and seams, and using budget paint that lacks the UV and mildew resistance Florida’s climate demands.
Every type of paint failure — peeling, bubbling, cracking, chalking, fading, mildew staining — has a specific cause and a specific fix. Identifying the cause before repainting is critical: applying new paint over an unresolved failure will produce the same result, usually faster.
You walk around the outside of your house and something catches your eye. Maybe it is a section of paint curling away from the wall near a window. Maybe the whole south side looks faded and chalky even though the home was painted not that long ago. Maybe there are dark streaks of mildew running down the stucco. Maybe there are small bubbles popping up all over one elevation.
Whatever you are seeing, paint failure on a Jacksonville home is never random. Every type of failure has a specific cause — and that cause almost always comes down to one of a handful of very predictable problems. The frustrating part is that most of those problems could have been prevented. The useful part is that once you understand what caused the failure, you know exactly what has to be fixed before any new paint goes on.
This guide is a complete diagnostic resource for every type of exterior paint failure you might encounter on a Jacksonville home. We will explain what causes each type, how to tell which one you are dealing with, what the fix looks like, and what to do differently the next time to prevent it from happening again.
Who wrote this: A New Leaf Painting has been diagnosing and correcting exterior paint failure on Jacksonville homes since 2003. Over 5,000 projects. We have seen every failure mode Florida’s climate produces, and we know what actually caused each one — not just what it looks like on the surface.
Exterior Paint Failure Types: Quick Reference Guide
Before we go deep on each type of failure, here is a quick reference table covering all eight major failure modes. Use this to identify what you are seeing on your home, then jump to the section that covers your specific problem.
| Failure Type | What It Looks Like | Most Common Cause | Urgency Level |
| Peeling | Paint lifting in sheets or flakes | Moisture behind paint film | High — act quickly |
| Bubbling / Blistering | Raised bubbles or blisters on surface | Moisture or heat trapped under film | High — water is getting in |
| Cracking / Crazing | Network of fine or larger cracks | Lost paint flexibility; substrate movement | Medium — water entry risk |
| Chalking | Powdery residue when you touch surface | UV binder degradation | Medium — end of service life |
| Fading | Washed-out, dull color | UV pigment breakdown | Low — cosmetic but signals aging |
| Mildew / Algae Staining | Dark green, gray, or black patches | Moisture + inadequate mildewcide | Medium — degrades surface over time |
| Efflorescence | White chalky mineral deposits | Water moving through masonry | High — active moisture infiltration |
| Lap Marks / Uneven Finish | Visible lines or sheen variation | Poor application technique | Low — cosmetic only |
Jacksonville-specific note: Because Jacksonville’s climate combines intense UV, year-round humidity above 70 percent, 52 inches of annual rain, and salt air in coastal areas, paint failure here tends to happen faster and more aggressively than the national average. The causes are the same as anywhere else — but Florida’s conditions accelerate every single one of them.
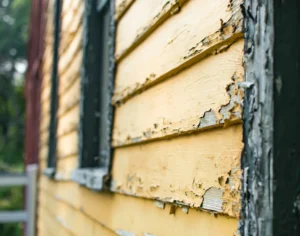
Paint Peeling: The Most Common and Most Urgent Failure in Jacksonville
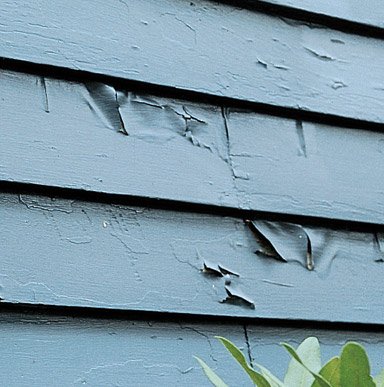
Peeling paint is the most visible sign of exterior paint failure, and it is the one that demands the fastest response. When paint peels, it is not just a cosmetic problem. It means the protective barrier between your home’s exterior structure and the weather has been broken — and every rain event after that is pushing moisture directly into exposed wood, stucco, or fiber cement.
What Peeling Paint Actually Looks Like
Peeling shows up in several forms depending on what caused it and how long it has been happening. Early peeling often looks like paint edges curling away from the surface in small areas — usually at corners, around windows, or along trim lines. As it progresses, the curling edges allow more water behind the film, and larger sections begin to lift and separate. In advanced cases, entire sections of paint come off in sheets, exposing bare substrate.
On stucco, peeling often starts as small areas of delamination — the paint separating from the masonry in patches rather than curling from edges. On wood siding, it almost always starts at the edges and bottom of boards where moisture entry is easiest.
The Three Root Causes of Peeling Exterior Paint
Cause 1: Moisture Behind the Paint Film
This is the most common cause of peeling on Jacksonville homes by a significant margin. Water gets behind the paint film — through a crack, a failed caulk joint, a gap around a window frame, or anywhere the paint film has thinned or failed — and once it is there, it has nowhere to go. It sits against the substrate, weakening the bond between paint and surface with every wet-dry cycle until the paint simply loses its grip and lifts away.
In Jacksonville’s climate, moisture entry happens fast. A hairline crack in stucco that lets in just a small amount of water during a summer thunderstorm can produce visible peeling within a season or two. The problem is almost always worse than it looks from the outside — by the time you see peeling, water has typically been infiltrating that area for months.
Do not paint over peeling paint: Painting over a peeling section without identifying and fixing the moisture source guarantees the same failure, often faster. The new paint goes on over a surface that is already compromised, and the moisture issue underneath continues. The patch may look fine for a few months and then peel again, usually in a larger area.
Cause 2: Painting Over a Wet or Damp Surface
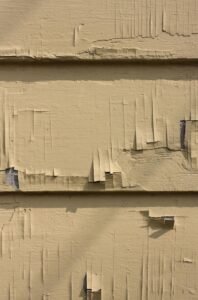
Paint applied to a surface that has not fully dried traps moisture inside the film as it cures. That trapped moisture eventually tries to escape as vapor, pushing the paint film outward from the inside. The result is peeling that appears from within the film itself — sometimes called intercoat peeling — where the paint looks like it is separating into layers rather than lifting from the wall.
In Jacksonville’s humidity, this is a more common problem than it sounds. Stucco holds moisture for a long time after rain or pressure washing. A surface that feels dry to the touch may still have elevated moisture content in the substrate. Professional painters use moisture meters to verify substrate moisture before applying any coating — a step that budget painters typically skip.
Cause 3: Poor Adhesion from Inadequate Preparation
Paint that was applied over a dirty, chalky, or glossy surface never had a proper bond to begin with. Dirt, mildew residue, chalk from degraded paint, and the glossy surface of old semi-gloss paint all prevent new paint from forming a molecular bond with the substrate. The paint looks fine initially but begins to peel within one to two years because it was never truly bonded to the wall — it was just sitting on top of contamination.
This is the most preventable type of peeling and the most commonly produced by painters cutting corners on preparation. Proper pressure washing, scraping, and sanding removes the contamination and creates a mechanical profile for new paint to bond to.
How to Fix Peeling Exterior Paint
The fix for peeling paint has two components: addressing the moisture source and correcting the surface. Doing only one without the other will produce the same result again.
- Identify and fix the moisture source: Inspect every joint, caulk line, crack, and penetration in the peeling area. Find where water is getting in and seal it before any painting begins. On stucco, this means checking for hairline cracks above the peeling area. On wood, it means checking all caulk joints and the condition of the substrate beneath the paint.
- Remove all loose and peeling paint: Every section of paint that has lost adhesion must be scraped or sanded away down to a firmly bonded surface. Painting over loose paint is not an option.
- Let the substrate fully dry: After fixing moisture sources and removing loose paint, allow the surface to dry completely — at least 24 to 48 hours in Jacksonville’s humidity, longer if the substrate was significantly wet.
- Prime the bare substrate: Any bare wood must be primed. Bare stucco patches must be primed to seal porosity and ensure even topcoat adhesion.
- Apply two full coats of premium paint: One coat is not enough. Two coats at proper film thickness are required for the protection and durability that prevents future failure.
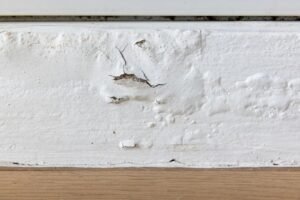
Bubbling and Blistering: What Those Raised Bumps Are Telling You
Bubbles or blisters in exterior paint are always a sign that something is pushing against the paint film from the inside. The film has not yet separated from the surface — it is still attached at the edges of each blister — but it has lost adhesion in the middle and is being pushed outward. If you pop a blister and find bare, dry substrate underneath, the cause was likely heat. If you find moisture or staining, the cause was water.
Heat Blistering: Painting in the Wrong Conditions
Heat blistering happens when paint is applied to a surface that is too hot, or when the air temperature rises rapidly after painting on a cool morning. The surface of the paint film skins over quickly in the heat, but the inner portion of the film has not yet dried. Solvents and moisture that need to evaporate during the drying process get trapped under the skinned-over surface and push it outward, forming blisters.
In Jacksonville, this is a real risk during summer months when surface temperatures on south- and west-facing walls can exceed 120 degrees by early afternoon. Paint applied to these surfaces in the morning may be fine initially, but if the temperature rises faster than the film can cure, blistering can develop within hours.
Ideal painting conditions for Jacksonville: Air temperature between 50 and 85 degrees Fahrenheit, surface temperature below 90 degrees, relative humidity below 85 percent, and no rain forecast for at least 24 hours. In Jacksonville’s summer, that window is typically early morning on days without a weather system approaching. Professional painters plan their schedules around these windows.
Moisture Blistering: Water Vapor Escaping Through the Film
Moisture blistering happens when water vapor from inside the wall or substrate tries to escape outward through the paint film. In Jacksonville, this occurs most commonly on exterior walls where interior moisture — from bathrooms, kitchens, laundry rooms, or high indoor humidity during summer — migrates through the wall structure and attempts to exit through the paint.
Moisture blistering tends to appear higher on walls where temperature differentials create vapor pressure, and it often recurs in the same locations because the underlying vapor drive does not stop. Fixing moisture blistering requires both removing the compromised paint and addressing the moisture source — whether that is improving interior ventilation, sealing interior surfaces, or correcting a drainage or grading issue that is keeping the wall wet.
How to Fix Bubbling and Blistering Exterior Paint
- For heat blistering: Scrape or sand all blistered areas down to bare or firmly bonded substrate. Prime any bare areas. Repaint in appropriate temperature conditions — morning hours in summer, avoiding peak heat on south- and west-facing walls.
- For moisture blistering: Identify the moisture source before repainting. Scrape all blistered paint. Allow the wall to fully dry. If the moisture source is interior vapor drive, consider adding a vapor barrier on the interior side or improving HVAC ventilation. Apply breathable, moisture-resistant exterior paint in two full coats.
Cracking and Crazing: When Paint Can No Longer Move With the Surface
Cracking in exterior paint comes in several varieties, and the type of crack pattern tells you a lot about what caused it. Some cracking is purely in the paint film. Some involves the substrate beneath. Knowing the difference determines whether you need a simple repaint or a more involved repair.
Hairline Cracking: Normal Paint Aging in Florida’s Climate
Fine hairline cracks in the paint film — sometimes called checking or crazing — develop when the paint binder loses its flexibility from UV degradation and age. Paint that was once flexible enough to move with the surface as it expands and contracts can no longer do so, and it cracks instead of stretching. On a Jacksonville home exposed to significant UV over many years, this is a normal end-of-life indicator for the paint.
Hairline cracks in the paint only (not in the substrate beneath) are a signal that the paint has reached the end of its service life and needs to be replaced. The fix is straightforward: proper surface preparation and a fresh coat of premium acrylic latex paint. If the substrate beneath is sound, no substrate repair is needed.
Alligatoring: Severe Cracking That Looks Like Scales
Alligatoring is a more severe form of cracking where the paint surface develops a pattern of raised, scaly cracks that resemble the texture of alligator skin. It is dramatic and hard to miss. Alligatoring typically has one of two causes: a hard topcoat applied over a soft primer or flexible undercoat (the two layers expand and contract at different rates), or a very old paint surface that has gone through so many UV cycles that the binder has completely broken down.
Alligatored paint cannot simply be repainted over. All of the alligatored paint must be removed — typically by scraping and sanding — down to the substrate or to firmly bonded paint. Painting over alligatoring creates a ridged, textured appearance in the new coat and the underlying failure continues beneath.
Full removal required: Alligatoring is one of the most common things we see on Jacksonville homes that have been repeatedly painted over without proper preparation. Each successive layer of paint applied over the old alligatored surface makes the problem worse and the eventual fix more labor-intensive. If you see alligatoring, remove it completely before any new paint goes on.
Substrate Cracking: When the Problem Is Below the Paint
On stucco homes — the majority of Jacksonville’s housing stock — cracking in the substrate itself is extremely common. These are not cracks in the paint film but cracks in the stucco masonry beneath, caused by the thermal expansion and settlement that Florida’s climate produces over time. The paint may crack along the same line as the stucco crack, or it may bridge the crack temporarily until it eventually fails.
Substrate cracks in stucco need to be addressed differently from paint-only cracks. Hairline stucco cracks (under 1/16 inch) can be addressed by elastomeric coating during the next repaint. Larger stucco cracks need to be filled with flexible elastomeric caulk or patching compound, primed, and then coated with elastomeric paint that can bridge any residual micro-movement.
Cracking at Joints and Caulk Lines
Cracking along the edges of windows, doors, and trim intersections is almost always a caulk failure rather than a paint failure. The caulk at those joints has dried, hardened, and lost its flexibility. When the joint moves — from thermal expansion, settlement, or wind load — the rigid caulk cracks rather than flexing. The paint over the cracked caulk then cracks in the same location.
The fix here is removing the old caulk completely, applying fresh flexible paintable caulk, and then painting over it. Painting over cracked caulk without replacing it just hides the crack temporarily. It reappears through the new paint within weeks or months.
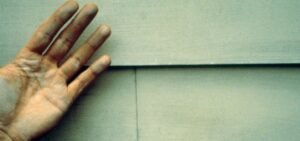
Chalking: When Your Paint Is Literally Falling Apart
Chalking is one of the most straightforward paint failure modes to diagnose. Run your hand across the exterior wall. If it comes away with a powdery white or colored residue, you are holding pieces of your paint film. That powder is the pigment particles that have been released from the paint because the binder holding them together has broken down.
Why Chalking Happens in Jacksonville’s Climate
UV radiation is the primary driver of chalking. Every day of sunshine causes a tiny amount of UV degradation in the paint binder — the polymer network that holds the pigment particles in place and bonds the film to the surface. In Jacksonville, with over 233 sunny days per year and a UV index that regularly reaches 8 to 10 during summer, this degradation happens faster than in most of the country.
Some degree of chalking toward the very end of a paint job’s life is considered normal. Excessive chalking — heavy powder transfer after just a few years — is a sign of an inferior paint product that lacks adequate UV protection. Budget paints and older oil-based formulas are particularly prone to early chalking in Florida’s UV environment.
Why Chalking Matters Beyond the Cosmetic
Chalking is a bigger problem than it might seem. Beyond making the paint look dull and dirty, chalking creates a surface contamination problem for the next paint job. New paint applied over a heavily chalked surface bonds to the loose chalk powder rather than the substrate. That bond is weak — and the new paint will peel early for exactly the same reason that paint peels when applied over a dirty surface.
This is why pressure washing is non-negotiable before any exterior repaint on a Jacksonville home. Even a surface that looks relatively clean may have a significant chalk layer that needs to be removed before new paint can adhere properly.
How to Fix Chalking Exterior Paint
- Pressure wash thoroughly: Remove all chalk residue from the surface. Test after washing by rubbing your hand across a dry section — if chalk transfer is still occurring, wash again.
- Let the surface fully dry: 24 to 48 hours in Jacksonville’s humidity.
- Apply a penetrating primer if chalking was heavy: A penetrating primer seeps into the porous, degraded surface and creates a fresh bonding layer for the topcoat.
- Apply two coats of premium UV-resistant paint: Sherwin-Williams Emerald or Benjamin Moore Aura — both engineered with UV-absorbing compounds that resist chalking far longer than standard products.
Color Fading: Why Jacksonville Paint Loses Its Color Faster Than It Should
Some fading is inevitable — all exterior paint loses some color vibrancy over its service life. But when fading is severe after just two or three years, or when one side of the house looks dramatically different from the others, that is a paint failure that could have been prevented.
UV Radiation: The Primary Cause of Fading
UV radiation breaks down the pigment molecules in paint — the chemical structures that absorb and reflect specific wavelengths of light to produce color. As pigments degrade, the color they produce weakens. Deep colors fade toward their lighter, muted versions. Bold colors look washed out. Colors that were vibrant when the home was first painted look sad and tired three years later.
Jacksonville’s UV environment accelerates this process. South- and west-facing walls receive the most direct sun exposure and always fade first. It is common to walk around a Jacksonville home and see dramatically different color saturation on different elevations — the shaded north wall still looks close to its original color while the south wall looks years older.
Dark Colors: The Fading Fast Lane
Dark and saturated colors absorb more solar energy than light colors, which both accelerates UV pigment degradation and raises surface temperatures dramatically. A dark navy wall on a Jacksonville afternoon can reach surface temperatures of 130 degrees or higher — temperatures that accelerate every chemical degradation process in the paint film, including pigment breakdown.
This does not mean you cannot use dark colors on a Jacksonville home. It means you need to use the right products — specifically paints with engineered UV-lock technology like Sherwin-Williams Emerald and Benjamin Moore Aura, which use advanced pigment systems and UV-absorbing compounds to slow color shift significantly under Florida’s sun.
Budget Paint and Early Fading
The most preventable type of severe early fading is the kind caused by using a budget paint product that lacks adequate UV resistance. Budget exterior paints often use lower-quality pigments that are more susceptible to UV breakdown and less UV-absorbing compounds in the binder. In Jacksonville’s UV environment, the difference in fading performance between a budget product and a premium product shows clearly within two to three years.
Homes painted with builder-grade or hardware-store exterior paint regularly show heavy fading within three years on south- and west-facing elevations. The same home painted with Sherwin-Williams Emerald or Benjamin Moore Aura will still show good color saturation at eight or ten years.
How to Address Faded Exterior Paint
Fading alone — without peeling, cracking, or other failure modes — is primarily a cosmetic problem, but it signals that the paint’s protective properties are also aging. Once color fading is visible and significant, the UV-blocking and moisture-protective functions of the coating are diminishing as well. The fix is a full repaint using premium UV-resistant products, properly applied over a cleaned and prepared surface.
Prevention is the whole fix: The only way to prevent fading is to use the right products from the start. No maintenance habit or cleaning routine will reverse UV-degraded pigment. Premium paint with UV-block technology is the investment that keeps colors looking right for the long term.
Mildew and Algae Staining: Jacksonville’s Most Persistent Paint Problem
Dark green, gray, or black staining spreading across exterior walls is one of the most common complaints we hear from Jacksonville homeowners. It is ugly, it keeps coming back, and when it is widespread, it can signal a more serious problem than just a dirty-looking wall. Understanding what is actually happening — and why it keeps returning — is the key to dealing with it effectively.
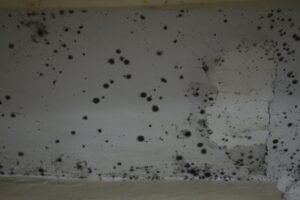
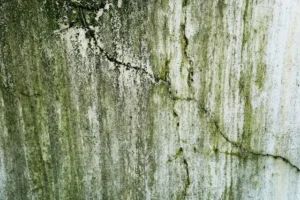
What Mildew and Algae Are Doing to Your Paint
Mildew and algae are living organisms that colonize exterior surfaces when moisture, warmth, and a food source are available. In Jacksonville, all three conditions exist simultaneously for most of the year. The food source is organic material in the paint film, drywall, and wall structure beneath it. The moisture is the humidity, rain, and condensation that Jacksonville homes experience constantly.
Beyond the visual problem, mildew secretes mild acids as part of its metabolic process. Those acids slowly break down the paint film chemistry — degrading the binder, attacking pigments, and reducing adhesion. Extended mildew colonization does not just stain the paint; it actually degrades it from the outside in. On wood substrates, sustained mildew growth can begin breaking down the wood fibers beneath the paint, contributing to rot.
Why Mildew Keeps Coming Back After Cleaning
One of the most frustrating experiences for Jacksonville homeowners is washing mildew off the exterior and watching it return within months. This happens for a predictable reason: cleaning removes the visible growth but does not address either the moisture conditions that allow it to grow or the exhausted mildewcide additives in the paint.
Premium exterior paints contain active mildewcide compounds that inhibit biological growth on the surface for years. Over time, those compounds are consumed. Once the mildewcide is exhausted — which in Jacksonville typically happens sometime in the second half of the paint’s service life — the surface becomes hospitable to mildew again. Washing removes the current colony but the surface is immediately vulnerable to recolonization.
The only lasting solution when mildew keeps returning is to repaint with a fresh premium product that restores the active mildewcide layer. Washing without repainting is maintenance, not a fix.
Annual soft-wash cleaning extends the time between repaints: Regular cleaning — ideally once a year — removes mildew colonies before they can cause significant damage and helps premium paint’s mildewcide additives last longer. It does not replace repainting, but it extends the gap between necessary repaints by one to three years on most Jacksonville homes.
How to Fix Mildew-Stained Exterior Paint
- Soft-wash the entire exterior: Use a mildewcide cleaning solution — not just plain water. A diluted bleach-and-detergent solution or commercial exterior mildew cleaner kills the active growth and removes staining. Plain water pressure washing does not kill mildew — it just moves it around.
- Allow to dry completely: 24 to 48 hours minimum in Jacksonville’s humidity.
- Apply a mildew-blocking primer on heavily affected areas: Particularly on north-facing elevations and any areas under dense tree canopy.
- Repaint with a premium product containing active mildewcide: Sherwin-Williams Duration or Emerald, or Benjamin Moore Aura — all of which have robust mildewcide additive packages engineered for Florida’s humid environment.
- Trim back vegetation: Shrubs, trees, and vines in contact with exterior walls trap moisture and shade the surface, creating the exact conditions mildew loves. Keep vegetation at least 12 inches back from all exterior surfaces.
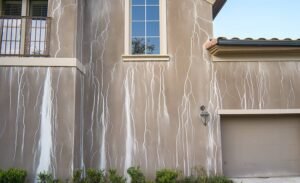
Efflorescence: The White Staining That Signals Active Water Infiltration
Efflorescence is one of the most misunderstood types of exterior paint and masonry failure. It looks like a paint problem — white or chalky deposits appearing on the surface — but it is actually a water problem. Understanding that distinction is critical to fixing it correctly.
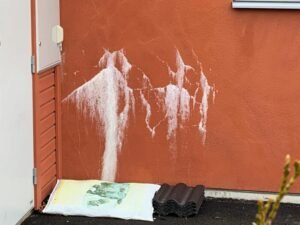
What Efflorescence Actually Is
Efflorescence is the white or grayish-white mineral deposit that forms on masonry surfaces — stucco, brick, concrete block — when water moves through the masonry and carries dissolved salts to the surface as it evaporates. The water enters the masonry somewhere — through a crack, a failed joint, a porous section of stucco — picks up soluble salts from the masonry as it moves through, and deposits them on the surface when it evaporates. The result is a chalky white stain that appears to grow over time.
On a Jacksonville stucco home, efflorescence most commonly appears around window frames, along stucco cracks, at the base of walls near grade level, and anywhere drainage, irrigation, or storm runoff consistently wets the wall.
Why Painting Over Efflorescence Always Fails
Painting over efflorescence without treating it first is one of the most reliable ways to guarantee early paint failure. The mineral deposits physically prevent paint from bonding to the masonry surface beneath them. New paint applied over efflorescence will peel, bubble, or flake within months — sometimes weeks — because it bonded to the mineral deposits rather than the wall.
Even more importantly: if you paint over efflorescence without addressing the water source, new deposits will form beneath the fresh paint as water continues to move through the masonry. The paint will blister and lift as new deposits push it from behind.
Find the water source first: Efflorescence cannot be fixed by a painter alone. It requires identifying where water is entering the masonry — and fixing that — before any surface treatment or painting begins. A painter who quotes you for efflorescence treatment without inspecting for the water source is giving you an incomplete fix.
How to Properly Fix Efflorescence
- Identify and eliminate the water source: Check gutters, downspouts, flashing, window caulk, irrigation spray patterns, and grade drainage near the affected area. Water should not be consistently wetting the affected wall surface.
- Treat the efflorescence with masonry cleaner: A diluted muriatic acid solution or commercial efflorescence remover dissolves the mineral deposits. Follow manufacturer instructions carefully — acid cleaners require protective equipment and careful neutralization after application.
- Rinse thoroughly and allow to dry completely: Residual acid must be fully neutralized and rinsed. The surface must be completely dry — 48 to 72 hours in Jacksonville’s humidity — before any primer or paint is applied.
- Apply a masonry sealer or alkali-resistant primer: This creates a barrier between the masonry and the new topcoat that resists any residual mineral migration.
- Apply premium topcoat: Elastomeric coating on stucco surfaces for maximum waterproofing. Premium acrylic on brick or block.
The 8 Root Causes of Exterior Paint Failure in Jacksonville
Every type of paint failure described in this guide traces back to one or more of eight root causes. Understanding these — not just the symptom on the surface — is what allows a paint job to be done correctly the next time rather than repeating the same failure.
| # | Root Cause | Failures It Produces | How to Prevent It |
| 1 | Moisture behind paint film | Peeling, bubbling, blistering | Fix all water sources; use elastomeric on stucco; recaulk all joints |
| 2 | Inadequate surface preparation | Peeling, chalking reappearance, early failure | Full pressure wash; scrape loose paint; moisture meter check before painting |
| 3 | Wrong paint for the surface | Cracking, peeling, early failure on stucco | Elastomeric for stucco; premium acrylic for fiber cement/wood |
| 4 | Painting in wrong conditions | Heat blistering, uneven cure, lap marks | Paint when temp 50–85°F, humidity below 85%, surface below 90°F |
| 5 | Budget or wrong paint product | Early fading, chalking, mildew, low washability | Sherwin-Williams Emerald/Duration or Benjamin Moore Aura/Regal Select |
| 6 | Skipped or thin primer | Poor adhesion, bleed-through, uneven finish | Prime all bare wood, patches, stains, and high-porosity areas |
| 7 | Failed caulk at joints | Cracking at trim lines, water infiltration, peeling at edges | Remove and replace all failed caulk before painting |
| 8 | Only one coat applied | Thin film, faster UV degradation, insufficient mildewcide | Always apply two full coats at manufacturer spec film thickness |
The uncomfortable truth about this list is that causes two through eight are all preparation and application failures — things that happen before or during the painting process, not things caused by the climate. Jacksonville’s weather accelerates paint failure, but it rarely creates it from scratch. Most premature paint failure on Jacksonville homes is the predictable result of preparation shortcuts.
How to Diagnose Your Exterior Paint Failure: A Step-by-Step Approach
If you are looking at a paint failure on your Jacksonville home right now and trying to figure out what to do, here is the diagnostic process professional painters use to identify the cause before recommending a fix.
Step 1: Identify the Type of Failure
Use the quick reference table at the beginning of this guide to match what you are seeing to a failure type. Is it peeling? Bubbling? A crack pattern? White deposits? Dark staining? Getting the type right is the first step because each type has different causes and different fixes.
Step 2: Find the Location Pattern
Where the failure is occurring tells you a lot about what caused it. Ask yourself:
- Is it on one specific elevation? South and west walls failing first usually means UV damage or heat blistering. North walls with mildew is a moisture and shade problem.
- Is it near water sources? Failure near gutters, downspouts, irrigation heads, or at the base of walls near grade points to moisture infiltration.
- Is it around windows and doors? Almost always caulk failure — check the caulk at those joints first.
- Is it in the same spots as the last failure? A recurring failure in the same location means the root cause was never addressed. The painting fix was applied but the underlying problem — a crack, a drainage issue, a ventilation problem — was left in place.
Step 3: Pop a Blister or Lift a Peeling Edge
If the failure involves blistering or peeling, carefully lift a piece of the failed paint and examine what is underneath. Dry, bare substrate with no staining means the failure was likely from the surface side — a preparation or application problem. Moisture, staining, or mildew growth on the substrate surface means water has been getting in from behind.
Step 4: Check the Surrounding Caulk and Joints
Even if caulk failure is not the obvious culprit, inspect all caulk lines in and around the failure area. Press on the caulk with your finger — it should be flexible and firmly bonded to both surfaces. If it is hard, cracked, or pulling away, that is a contributing cause regardless of what else is happening.
Step 5: Address the Cause Before the Surface
This is the step that most homeowners skip and most budget painters gloss over. Before any painting begins, every identified cause must be resolved. A moisture source must be sealed. Caulk must be replaced. Damaged substrate must be repaired. The surface must be clean and dry. Only after all of those things are done does the painting work begin.
The most important rule in paint failure repair: Do not repaint until you know what caused the failure and have fixed it. Repainting over an unresolved cause produces the same failure, usually in less time than the original.
How to Prevent Exterior Paint Failure on Jacksonville Homes
The good news about exterior paint failure is that the overwhelming majority of it is preventable. Here is what it actually takes to produce a paint job that reaches its full rated lifespan in Jacksonville’s demanding climate.
Use the Right Products for Florida’s Conditions
Premium acrylic latex paint from Sherwin-Williams or Benjamin Moore — specifically products designed for high-UV and high-humidity environments — is the foundation of a durable Jacksonville paint job. Sherwin-Williams Emerald and Duration, and Benjamin Moore Aura and Regal Select, are the products that consistently deliver 8 to 15 year lifespans on Jacksonville homes when properly applied. Elastomeric coating is the correct choice for stucco surfaces with any cracking history.
Never Skip Preparation
Every paint failure cause in this guide — with the exception of buying bad paint — can be prevented by thorough preparation. Pressure washing removes the contamination that prevents adhesion. Crack repair and caulking eliminate the moisture entry points that cause peeling and bubbling. Priming creates the bonding layer that allows topcoat to achieve its full performance. Moisture meter verification before painting prevents the trapped-moisture failures that produce early blistering.
Preparation is not the glamorous part of painting. It is the part that makes or breaks the lifespan of the finished job.
Apply Two Full Coats
One coat of paint is not enough on any exterior surface in Jacksonville. Two coats applied at the manufacturer’s specified film thickness deliver the UV protection, moisture resistance, and mildewcide concentration the product is designed to provide. A single thin coat gives you roughly half the protection and half the lifespan.
Maintain Your Exterior Between Repaints
A few simple habits extend paint life by two to three years on most Jacksonville homes:
- Soft-wash the exterior every one to two years to remove mildew, algae, salt, and pollen before they degrade the paint
- Inspect and replace failing caulk every three to five years — do not wait for the full repaint cycle
- Trim vegetation back from exterior walls to improve airflow and reduce moisture on shaded elevations
- Keep gutters clean and downspouts directing water away from the foundation and wall base
- Do a quick visual inspection of all exterior surfaces after any major storm
Frequently Asked Questions: Exterior Paint Failure in Jacksonville, FL
These are the questions Jacksonville homeowners ask us most often after discovering paint failure on their home. Each answer is written to be directly useful whether you are reading this guide or asking a voice assistant or AI tool.
Why is my exterior paint peeling in Jacksonville?
Exterior paint peels in Jacksonville for three main reasons: moisture getting behind the paint film through cracks, failed caulk, or gaps around windows and doors; painting over a surface that was not fully dry — which traps moisture inside the film as it cures; or inadequate surface preparation that left contamination between the paint and the substrate, preventing a proper bond. Jacksonville’s heavy summer rain and high humidity make all three of these causes more likely and more damaging than in drier climates. The fix always requires identifying and resolving the moisture source before repainting — not just applying new paint over the peeling area.
Why does my exterior paint bubble and blister in Florida?
Exterior paint bubbles and blisters in Florida from two causes: heat blistering, when paint is applied to a surface that is too hot and the film skins over before solvents can escape; and moisture blistering, when water vapor from inside the wall tries to escape outward through the paint film. Jacksonville’s summer heat — with surface temperatures on south and west walls exceeding 120 degrees — makes heat blistering a real risk when painting in afternoon conditions. Moisture blistering is driven by Jacksonville’s high indoor and outdoor humidity. Both types require removing the compromised paint, addressing the root cause, and repainting in appropriate conditions with premium, breathable exterior paint.
Why does exterior paint fade so fast in Jacksonville?
Exterior paint fades faster in Jacksonville than in most U.S. cities because of the combination of over 233 sunny days per year, a UV index that regularly reaches 8 to 10 in summer, and intense afternoon heat on south- and west-facing walls. UV radiation breaks down the pigment molecules in paint — causing color to fade — and degrades the paint binder, which causes chalking and eventual film failure. Budget paint products with inadequate UV-blocking compounds will show significant fading within two to three years on Jacksonville homes. Premium products like Sherwin-Williams Emerald and Benjamin Moore Aura, which contain advanced UV-absorbing technology, hold color significantly longer under the same conditions.
What causes white stains on stucco in Jacksonville?
White stains on stucco in Jacksonville are almost always efflorescence — mineral deposits left on the surface when water moves through the masonry and evaporates. Efflorescence indicates active water infiltration into the stucco, most commonly through cracks, failed caulk at window frames, or areas where drainage or irrigation consistently wets the wall. It cannot be fixed by painting over it — paint applied over efflorescence will peel quickly because the mineral deposits prevent adhesion. The fix requires identifying and eliminating the water source, treating the deposits with a masonry cleaner, and allowing the surface to fully dry before applying an alkali-resistant primer and elastomeric topcoat.
Why does mildew keep coming back on my Jacksonville home after I wash it?
Mildew returns after washing because cleaning removes the active biological growth but does not restore the mildewcide protection in the paint. Premium exterior paints contain active mildewcide compounds that inhibit growth on the painted surface for years. Over time — typically in the second half of the paint job’s service life — these compounds are exhausted and the surface becomes hospitable to mildew again. Washing removes the current colony, but the surface is immediately vulnerable to recolonization. The only lasting solution when mildew keeps returning is repainting with a fresh premium product that restores the active mildewcide layer. Sherwin-Williams Duration Exterior has one of the strongest mildewcide packages available for this specific problem.
How do I know if my paint failure is a preparation problem or a paint quality problem?
The timing and pattern of paint failure is the most reliable indicator of which caused it. Paint failure that appears within one to three years of a paint job — especially peeling, blistering, or poor adhesion — is almost always a preparation problem: moisture behind the film, painting over a dirty surface, or skipping primer. Paint failure that appears after five or more years, primarily in the form of fading, chalking, and general wear, is more consistent with paint quality limitations or normal aging. Budget paint products in Jacksonville’s UV environment will show premature fading and chalking at three to four years regardless of preparation quality, because they simply lack the UV resistance for Florida’s conditions.
Can I paint over peeling exterior paint, or does it all have to come off first?
All peeling and loosely bonded paint must be removed before new paint is applied. Painting over peeling paint — even with a primer coat over it — does not create a sound surface. The new paint bonds to the peeling layer, and when the peeling layer continues to separate from the substrate (which it will), it takes the new paint with it. All loose, peeling, or bubbling paint must be scraped or sanded down to a firmly bonded surface. If that firmly bonded surface is the bare substrate, the substrate must then be cleaned, dried, and primed before topcoat. There is no shortcut that produces a lasting result.
What is the best exterior paint to prevent failure in Jacksonville’s climate?
The best exterior paints for preventing premature failure in Jacksonville’s climate are premium acrylic latex products with strong UV resistance, built-in mildewcide, and high moisture resistance. Sherwin-Williams Emerald Exterior is the top choice for maximum UV and fade resistance. Sherwin-Williams Duration Exterior is the best choice when mildew resistance is the primary concern. Benjamin Moore Aura Exterior offers the best color retention for deep colors in Florida’s UV environment. For stucco homes, elastomeric coating is the professional standard because it bridges hairline cracks and forms a continuous waterproof membrane. None of these products will perform as designed without thorough preparation — the product and the preparation work together.
About A New Leaf Painting — Jacksonville’s Exterior Painting Specialists
A New Leaf Painting has been diagnosing and correcting exterior paint failure on Jacksonville and Northeast Florida homes since 2003. More than 5,000 exterior projects across this market. We have seen every failure mode described in this guide — on stucco, fiber cement, wood, and brick — in every coastal and inland condition Northeast Florida produces.
When we inspect a home before providing an estimate, we are not just measuring square footage. We are looking for the root causes of any existing failure, identifying moisture entry points, assessing caulk condition, and evaluating the substrate beneath the current paint. That diagnostic step is what allows us to give homeowners honest, specific recommendations rather than just proposing to paint over whatever is there.
We hold all required Florida contractor licenses, carry full liability insurance and workers compensation coverage, and back every project with a written warranty on both workmanship and materials.
What Jacksonville Homeowners Get With A New Leaf Painting
- Free exterior inspection: we identify failure modes, diagnose root causes, and give you an honest assessment before any commitment
- Moisture source identification and repair recommendations before painting begins
- Full preparation: pressure washing, loose paint removal, crack repair, recaulking, priming — never skipped
- Premium paint systems from Sherwin-Williams and Benjamin Moore matched to your surface type and failure history
- Elastomeric coating expertise for Jacksonville’s stucco-heavy housing stock
- Two-coat application at correct film thickness with material records at project completion
- Written workmanship and material warranty on every project
- Hundreds of verified five-star reviews from Jacksonville homeowners
Seeing Paint Failure on Your Jacksonville Home?
Call or text 904-615-6599 for a free inspection and honest diagnosis.
We will identify what is causing the failure, tell you exactly what needs to be fixed, and give you a transparent estimate for doing it right.
Serving Jacksonville • Jacksonville Beach • Ponte Vedra • Atlantic Beach • Neptune Beach • Fleming Island • Orange Park