Removing wallpaper sounds simple enough. You soak it, you scrape it, you paint. But anyone who has done it — or watched it done wrong — knows that the process can go sideways fast. Torn drywall facing. Gouges that require extensive repairs. Walls so saturated with water that they take weeks to dry in Florida’s humidity. And when you finally get to painting, every imperfection that was hiding under the wallpaper is now front and center under fresh paint.
Jacksonville homeowners deal with an extra layer of complexity that most guides do not address. Florida’s year-round humidity means drywall that gets too wet during removal takes much longer to dry and is significantly more vulnerable to mold growth if painting starts too soon. Getting wallpaper removal right in this climate requires a slightly different approach than the national guides suggest.
This guide covers every risk in the removal process, how to avoid each one, and what the wall needs after removal before paint can go on. Whether you are doing this yourself or evaluating a contractor, knowing what should happen at each step puts you in control of the outcome.
From Thomas Drake, Owner, A New Leaf Painting: Wallpaper removal is one of the most misunderstood prep jobs in interior painting. We have been doing it in Jacksonville homes since 2001 and we have seen every way it can go wrong. Everything in this guide comes from that experience.
Why Wallpaper Removal Is More Complicated Than It Looks
The difficulty of any wallpaper removal job depends on three things that vary widely from home to home: the type of wallpaper, the age of the drywall beneath it, and whether a primer was applied to the wall before the wallpaper was installed. Get any of those three things wrong in your assessment and the job gets significantly harder.
The Type of Wallpaper Changes Everything
Not all wallpaper is the same, and the type determines how easily it comes off and how much risk it poses to the drywall beneath.
| Wallpaper Type | Removal Difficulty | Main Risk |
| Strippable / peel-and-stick | Low | Adhesive residue left on wall; easy to manage |
| Vinyl-coated (most common) | Moderate | Top layer peels but backing stays; must be soaked separately |
| Fabric-backed vinyl | Moderate to high | Very durable backing; requires scoring and extended soaking |
| Foil wallpaper | High | Tears easily; requires very careful scoring to avoid drywall damage |
| Multiple layers (common in older homes) | Very high | Each layer adds complexity; earlier layers may be oil-based paste |
| Grasscloth or natural fiber | Very high | Absorbs water, falls apart in pieces; leaves backing glued to wall |
The Age of Your Drywall Determines the Risk Level
This is the factor that most DIY guides skip and that causes the most damage. The age of the drywall behind the wallpaper fundamentally changes how aggressive you can be with water and scrapers.
- Older drywall (pre-1980s): Many older Jacksonville homes have drywall or plaster walls that were never designed to have wallpaper removed with wet methods. The paper facing on older drywall delaminates easily when wet, leaving behind a fuzzy, damaged surface that takes significant repair work to make paintable.
- Newer drywall without primer: If wallpaper was installed directly over unprimed drywall — a very common shortcut — the wallpaper adhesive has bonded directly to the paper facing. Removing it tears the facing with the paper. This is the most common cause of serious drywall damage during wallpaper removal.
- Newer drywall with primer: Wallpaper installed over primed drywall is the easiest removal scenario. The primer creates a barrier between the adhesive and the drywall facing, allowing the wallpaper to come off without tearing the wall beneath.
How to test your drywall condition: Find a small, inconspicuous area — behind a door or in a closet if the wallpaper extends there. Wet a small section and try to peel back a corner of the wallpaper. If the drywall facing comes with it in a fuzzy, torn mess, the wall was not primed before wallpaper installation. Plan for drywall repair as part of the job, not an afterthought.
Florida’s Humidity Adds a Layer of Complexity
In a dry climate, a wall that gets wet during wallpaper removal dries in hours. In Jacksonville, where humidity regularly runs above 70 percent, wet drywall can take 24 to 72 hours or more to fully dry — and if painting starts before that happens, moisture gets trapped behind the primer and paint, which causes blistering and peeling, and in severe cases, promotes mold growth inside the wall.
This is not a theoretical risk in Florida. We see it regularly on DIY wallpaper removal jobs where homeowners applied primer the same day or the day after removal and then wondered why the paint started bubbling within weeks. The wall felt dry to the touch on the surface but had not dried through to the drywall core.
Florida rule of thumb: After any wet wallpaper removal in Jacksonville, wait a minimum of 48 hours before priming. In rooms with poor air circulation or during summer when outdoor humidity is highest, 72 hours is safer. Run fans and keep the AC running during the drying period.
The Six Biggest Risks of Wallpaper Removal — and How to Avoid Each One
Risk 1: Tearing the Drywall Paper Facing
This is the most common and most damaging mistake in wallpaper removal. When the drywall paper facing tears away with the wallpaper, it leaves a rough, absorbent surface that cannot be painted without extensive repair. You can feel it immediately — the wall surface feels soft and fuzzy where the facing has been damaged.
How to avoid it: Never dry-strip wallpaper. Always wet the surface adequately before trying to remove it. If the facing starts tearing, stop pulling and add more moisture. Let the solution soak for at least five minutes before attempting removal again. Patience is what prevents this damage — not force.
Risk 2: Gouging the Wall With a Scraper
Metal scrapers applied with too much pressure leave gouges in the drywall beneath the wallpaper. These show clearly under paint, especially with any sheen level above flat. A gouge that is a quarter inch deep is a repair that takes time to fill, sand, and prime properly before painting.
How to avoid it: Hold the scraper at a low angle — almost flat against the wall — rather than digging it in at a steep angle. Use a plastic scraper on older or delicate drywall rather than metal. Let the water do the loosening work. If the paper is not coming off easily, it needs more soak time, not more scraper pressure.
Risk 3: Over-Scoring the Wall
Scoring the wallpaper before wetting helps the removal solution penetrate the vinyl top layer. But a scoring tool with too many teeth set too deep will perforate not just the wallpaper but the drywall beneath. Those perforations show through paint.
How to avoid it: Use a scoring tool with a light touch and make multiple lighter passes rather than one aggressive pass. The goal is to perforate the wallpaper surface, not cut into the wall. On older plaster walls, skip the scoring tool entirely and rely on extended soak time instead.
Risk 4: Missing Adhesive Residue
After the wallpaper is off, the adhesive that held it to the wall is still there. It is often invisible when dry but becomes a significant problem when paint goes over it. Adhesive residue causes paint to look uneven, sheen to vary across the wall, and in some cases causes paint to peel.
How to avoid it: After all wallpaper is removed, wash the entire wall with a solution of warm water and white vinegar or a dedicated adhesive remover. Run your hand across the wall when dry — any sticky or slightly rough areas still have adhesive. Those spots need a second wash before any primer goes on.
Risk 5: Painting Too Soon After Removal
This is the risk that Florida’s climate makes especially dangerous. Drywall that is still holding moisture from the removal process will not accept primer or paint properly. The paint film will blister, peel, or develop mold beneath it.
How to avoid it: Wait. In Jacksonville, 48 to 72 hours of drying time with fans running and the AC on before any primer is applied. Use a moisture meter if you have one — walls should read below 12 percent moisture content before priming. If you do not have a meter, press your hand firmly against the wall in several spots. Cool, cold-feeling drywall still has moisture in it.
Risk 6: Skipping Skim Coat and Primer
Even a professionally executed wallpaper removal leaves the wall surface imperfect. Old adhesive, minor tears, texture variations, seams where the wallpaper joined — all of it needs to be addressed before paint. Homeowners and contractors who go from stripped wall to paint in one step without skim coating damaged areas and applying a quality primer end up with walls that show every imperfection under the finish coat.
How to avoid it: After the wall is fully dry and clean, skim coat all damaged or uneven areas with joint compound. Sand smooth when dry. Apply a PVA drywall primer or an oil-based primer to the entire wall before topcoat. This sealing step is not optional — it is what allows the paint to go on evenly and look the way it should.
The step that separates a good result from a great one: After wallpaper removal, prime the entire wall with a high-quality PVA primer or oil-based primer — not standard latex primer. A PVA primer specifically seals the drywall surface, prevents the topcoat from being absorbed unevenly, and hides the variations left by removal. This is the step most people skip and the reason freshly painted walls sometimes look patchy or uneven even with expensive paint.
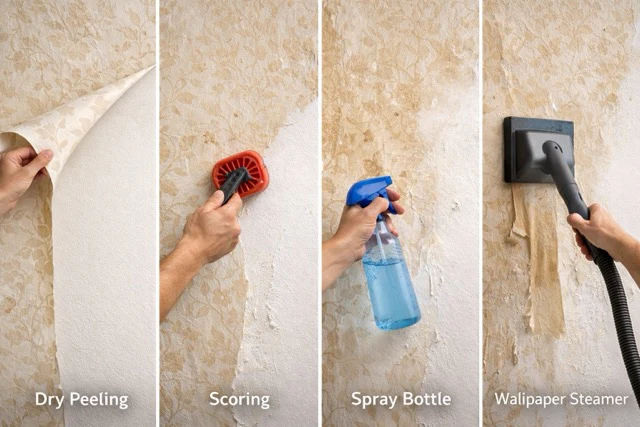
How to Remove Wallpaper the Right Way: Step-by-Step for Jacksonville Homes
Here is the complete process in the right order. Do not skip steps or combine them. Each one builds on the last.
Step 1: Protect Everything That Is Not the Wall
Turn off the electricity to the room at the breaker panel — water and electrical outlets do not mix. Remove all outlet covers and switch plates. Cover the floor with drop cloths or plastic sheeting and tape the edges to the baseboard. Move all furniture out of the room or to the center and cover with plastic.
Step 2: Test a Small Section First
Before committing to a method, test a small area to understand what you are working with. Try dry-peeling a corner. If it comes off cleanly, you may have strippable paper. If not, wet a small section and try peeling after five minutes. Note how the drywall responds. This test informs every decision that follows.
Step 3: Score the Wallpaper Surface
For vinyl-coated or fabric-backed wallpaper, use a scoring tool to perforate the surface layer so the removal solution can penetrate. Work in small sections — about 4×4 feet — using light, consistent pressure. Do not overscore. On older or damaged walls, use a damp sponge method instead of scoring to reduce the risk of wall damage.
Step 4: Apply Removal Solution
Mix warm water with fabric softener (a cap per quart of water) or use a dedicated wallpaper removal solution. Apply with a sponge, roller, or garden sprayer. Work in sections small enough that the solution does not dry before you start scraping — in Jacksonville’s heat, that means no more than 4×4 feet at a time. Let the solution soak for at least five minutes before scraping.
Jacksonville-specific tip: In Florida’s heat and humidity, the removal solution can evaporate from the wallpaper surface faster than in cooler climates. Keep a spray bottle handy and re-wet sections that start to dry before you have scraped them. Working in the morning before the house heats up makes this easier to manage.
Step 5: Scrape at a Low Angle
Hold the scraper at a very low angle — nearly flat against the wall — and apply gentle, even pressure. Work from the top of the section downward. If the paper tears or the wall facing starts coming off, stop, add more solution, and wait another five minutes. The paper should come off in sheets with light pressure when it is adequately wet.
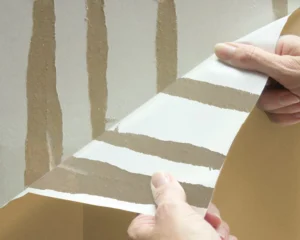
Step 6: Remove the Backing Layer
Many wallpapers have a top decorative layer and a separate backing layer. After the top layer comes off, the backing may still be on the wall. Re-wet the backing and repeat the scraping process. The backing is often easier to remove than the top layer once the main paper is gone.
Step 7: Wash the Entire Wall
Once all paper and backing are removed, wash the entire wall surface with a warm water and white vinegar solution or a dedicated adhesive remover. The goal is to remove all adhesive residue — every bit of it. Run your hand over the wall when dry to check for tacky spots. Rewash any areas that still feel sticky.
Step 8: Dry Completely
This is the step that Florida’s climate makes most important. Run fans, keep the AC on, and wait a minimum of 48 hours before doing anything else to the wall. Do not prime. Do not patch. Do not paint. Let the wall dry completely through.
Step 9: Repair All Damage
After drying, inspect the wall carefully. Fill all gouges, torn facing areas, and seam depressions with joint compound. Allow to dry, sand smooth, and repeat as needed until the surface is even. In many Jacksonville homes, this repair stage takes longer than the removal itself.
Step 10: Prime Before Painting
Apply a PVA drywall primer or oil-based primer to the entire wall surface — not just the repaired areas. Allow full cure time per the manufacturer’s instructions. Sand lightly with 220-grit paper after priming if needed for a smooth surface. Only then is the wall ready for topcoat.
DIY Wallpaper Removal vs. Professional Removal: What to Consider
Wallpaper removal is one of those jobs that looks straightforward until you are three hours in with torn drywall facing and a floor covered in wet paper strips. Here is an honest breakdown of when DIY makes sense and when professional removal is the smarter call.
| Factor | DIY Removal | Professional Removal |
| Skill required | Moderate — patience is the key skill | Experienced technique reduces drywall damage risk |
| Time investment | Full weekend for an average room | 1 to 2 days for most rooms |
| Drywall damage risk | Higher — most DIY damage comes from rushing | Lower with experienced technique and correct tools |
| Florida humidity management | Easy to get wrong — painting too soon is common | Professionals know the correct drying windows |
| Post-removal prep | Often skipped or rushed | Full skim coat, sand, and prime included |
| Final paint quality | Variable — depends on prep quality | Consistent when bundled with interior painting |
| Cost | Materials only ($30–$80) | $1–$3 per sq ft depending on paper type and condition |
| Best for | Small rooms, one layer of strippable paper, newer primed drywall | Multiple layers, older homes, grasscloth, large areas, or homes with lead paint concerns |
The case for professional removal gets stronger when wallpaper removal is being bundled with interior painting. A professional crew that handles both removal and painting treats them as a single integrated prep-and-paint process — the wall prep after removal is done to the standard needed for a quality paint job, not just to the point where it looks roughly okay.
Lead paint consideration: Jacksonville homes built before 1978 may have lead-based paint on the walls beneath the wallpaper. If your home was built before 1978, test for lead before starting any removal work. Disturbing lead paint without proper precautions is a health hazard. A New Leaf Painting is Lead-Safe Certified and can handle pre-1978 projects safely.
What Needs to Happen After Wallpaper Removal Before You Can Paint
This section is where most people underestimate the work involved. Removing the wallpaper is the first half of the job. Getting the wall ready for paint is the second half — and in many Jacksonville homes, it takes just as long.
Skim Coating: Filling the Surface Variations
After wallpaper removal, walls are rarely smooth. There are seam depressions where the wallpaper edges were, torn areas where the drywall facing came off, texture variations from uneven adhesive distribution, and in older homes, a patchwork of repairs done over decades under the wallpaper. Skim coating — applying a thin layer of joint compound across the wall surface — fills and levels all of those variations.
A full skim coat on a room takes multiple applications, drying time between each coat, and careful sanding to achieve a truly smooth surface. It is skilled work that produces a dramatically better final paint result than patching individual spots and hoping the paint covers the variations. In our experience, rooms that receive a full skim coat after wallpaper removal look noticeably better painted than rooms that did not.
PVA Primer: The Sealing Step That Changes Everything
Bare drywall and freshly skimmed surfaces absorb paint unevenly. PVA (polyvinyl acetate) primer seals the surface, equalizing the porosity so the topcoat goes on evenly and looks consistent across the entire wall. Without this step, you will see areas where the paint looks slightly different — darker, shinier, or more matte — based on what the substrate is doing beneath it. No amount of additional topcoat coats fixes the problem once it starts. The primer has to go on first.
The Final Check Before Paint
Before any topcoat goes on, the wall should pass this check: run your hand across the entire surface in good light. It should feel smooth and consistent with no ridges, bumps, depressions, or rough patches. Hold a work light at a raking angle to the wall — imperfections that are invisible under flat ambient light show clearly under raking light. Any variation you can see at this stage will show under paint. Fix it now, not after.
The painting prep standard we use: At A New Leaf Painting, we do a raking light inspection on every wall before primer and again after primer. If we can see it, we fix it. That standard is what allows us to back every interior project with our Iron-Clad Guarantee.
Frequently Asked Questions: Wallpaper Removal in Jacksonville, FL
How much does wallpaper removal cost in Jacksonville, FL?
Professional wallpaper removal in Jacksonville typically costs $1 to $3 per square foot of wall surface, depending on the number of layers, the type of wallpaper, the age and condition of the drywall beneath, and how much wall repair is needed after removal. A standard 12×14 room with single-layer vinyl wallpaper and good drywall condition typically runs $300 to $600 for removal alone. Rooms with multiple layers, grasscloth, or significant drywall damage requiring skim coating will be on the higher end. Most homeowners bundle removal with interior painting for a better overall result and price.
Will wallpaper removal damage my drywall?
Wallpaper removal carries a real risk of drywall damage, but the risk can be managed significantly with proper technique. The biggest risk factor is whether the drywall was primed before the wallpaper was installed. If it was not — which is common in Jacksonville homes built in the 1980s and 1990s — the wallpaper adhesive has bonded directly to the drywall paper facing, and removal will tear it. This damage is repairable with skim coating and primer, but it adds time and cost to the project. A test in an inconspicuous area before committing to a removal method helps assess the damage risk.
Can you paint directly over wallpaper instead of removing it?
Technically yes, but it is almost never recommended and in most cases produces poor results. Paint applied over wallpaper traps moisture that can cause the wallpaper to bubble, seams to show through the paint, and adhesive to eventually fail. Textured wallpaper patterns read through the paint finish. And any future decision to remove the wallpaper becomes far more difficult because the paint seals the paper to the wall. The correct approach is always to remove wallpaper before painting. The prep work required after removal — skim coating, priming, patching — is worth doing right.
How long does wallpaper removal take in Jacksonville?
A single room with one layer of vinyl wallpaper in reasonable condition typically takes a professional crew four to eight hours for removal, adhesive washing, and initial wall assessment. Adding drying time (48 to 72 hours in Jacksonville’s humidity), skim coating, and priming before painting is ready to begin means the full prep process for a single room runs two to three days. Larger rooms, multiple layers, grasscloth, or significant drywall damage extend that timeline. DIY removal of the same room typically takes a full weekend for a homeowner working alone.
Should I hire a professional for wallpaper removal or do it myself?
For most Jacksonville homeowners, professional wallpaper removal is worth the cost when it is bundled with interior painting. The combination ensures the wall prep is done to the standard required for a quality paint job, not just done quickly. DIY removal makes the most sense for small rooms with modern strippable wallpaper on newer primed drywall, where the risk of damage is lower and the scope is manageable in a weekend. The risk of DIY increases significantly in older homes, rooms with multiple wallpaper layers, grasscloth or natural fiber paper, or any situation where drywall damage would be costly to repair.
What is the hardest type of wallpaper to remove?
Grasscloth and natural fiber wallpapers are the most difficult to remove in Jacksonville’s climate because they absorb water during the removal process, which causes them to fall apart in small pieces rather than coming off in sheets. The natural fiber backing also adheres very firmly to the wall and frequently pulls the drywall facing with it. Multiple-layer installations — where two or more generations of wallpaper were hung on top of each other over the decades — are also extremely challenging because each layer has to be removed separately and older layers may be adhered with oil-based paste that does not respond to water-based removal solutions.
A New Leaf Painting — Wallpaper Removal and Interior Painting in Jacksonville
A New Leaf Painting has been refreshing Jacksonville interiors since 2001 — and we know that a beautiful paint job starts with getting the surfaces right before color ever goes on the wall. If you have old wallpaper that needs to come down, our wallpaper removal team handles it cleanly without damaging the drywall beneath. If your walls have dings, cracks, or water stains, our drywall repair crew patches everything to a seamless finish first. Not sure which colors will work in your specific rooms? We offer a free color consultation — we bring samples to your home and help you test colors in your actual light conditions before you commit to anything.
When every surface is ready, our interior painting team applies premium zero-VOC Sherwin-Williams and Benjamin Moore products matched to each room’s specific demands. And if your kitchen cabinets are looking dated, our cabinet painting and refinishing service transforms them at a fraction of the cost of replacement. Wondering what your project will run? Our interior painting cost guide breaks down real Jacksonville pricing so you can plan your budget with confidence. When you are ready, call or text 904-615-6599 for a free, no-surprise estimate backed by our Iron-Clad Guarantee.